Friday, April 3, 2015

Install Apache,MySQL,phpmyadmin on Ubuntu 14.04

Step One — Install Apache

Open Terminal type these commands:

sudo apt-get update
sudo apt-get install apache2

Afterwards, your web server is installed.You can do a spot check right away to verify that everything went as planned by visiting your server's
type (localhost) in your web browser..

Step Two — Install MySQL

sudo apt-get install mysql-server-5.6

Step Three — Install PHP

sudo apt-get -y update
sudo apt-get -y install phpmyadmin

Step Four: Basic Configuration
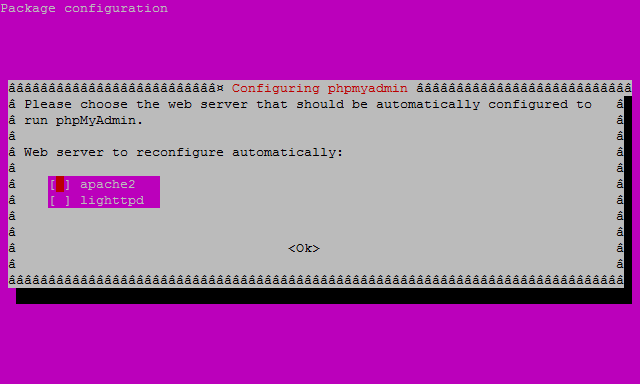
1) At the first screen, select apache2 by using the space bar, then hit enter to continue.

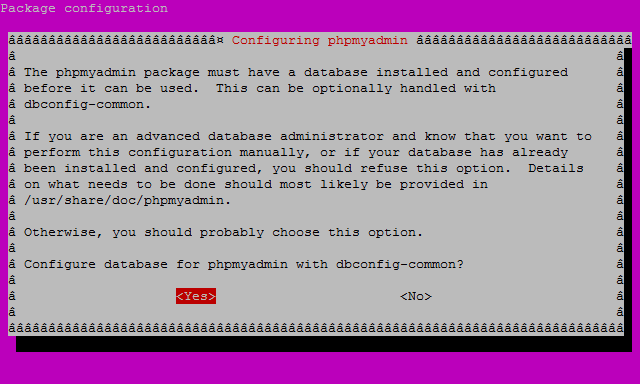
2) At the second screen, which asks “configure the database for phpmyadmin with dbconfig-common?”, select Yes , then hit enter to continue.

3) At the third screen enter your MySQL password, then hit enter to continue.

4) And finally at the fourth screen set the password you’ll use to log into phpmyadmin, hit enter to continue, and confirm your password.


Step Five : Finish the Configuration of Apache2
For a refresher on editing files...
 /etc/apache2/apache2.conf
Add the following to the bottom of the file:

# phpMyAdmin Configuration
Include /etc/phpmyadmin/apache.conf

Then exit and save the file And, restart Apache2 service..
sudo service apache2 restart


Install php5-curl
sudo apt-get install php5-curl

Install php5-curl
sudo php5enmod mcrypt

Google chrome not run as root in Ubuntu

Run chrome as root user follow these steps:-
1) Open /opt/google/chrome folder
2) Open google-chrome file
3) Change last line of file with
4) Actual line
   exec -a "$0" "$HERE/chrome" "$@"
5) After change line
   exec -a "$0" "$HERE/chrome" "$@" --user-data-dir
6) Save and close the file

Enable root login in Ubuntu 14.04

Step 1. Execute the following command in terminal.

sudo gedit /usr/share/lightdm/lightdm.conf.d/50-unity-greeter.conf

Step 2:Copy and paste below lines into the file and save it.

greeter-show-manual-login=true

Step 3: Save and close gedit.

Now, restart your Ubuntu machine

Enable Hibernate in Ubuntu 14.04

To re-enable hibernate,open Terminal and run the commands below one by one to edit the config file:

sudo -i

cd /var/lib/polkit-1/localauthority/50-local.d/

gedit com.ubuntu.enable-hibernate.pkla

Tips: if the config file does not work for you, try another one by changing /var/lib to /etcin the code.

Copy and paste below lines into the file and save it.

[Re-enable hibernate by default in upower]
Identity=unix-user:*
Action=org.freedesktop.upower.hibernate
ResultActive=yes
[Re-enable hibernate by default in logind]
Identity=unix-user:*
Action=org.freedesktop.login1.hibernate
ResultActive=yes

Friday, August 8, 2014

How to clear browser's cache and cookies from terminal in ubuntu

1) Clean up memory on linux
$ sync; echo 3 | sudo tee /proc/sys/vm/drop_caches

2)Clear filesystem memory cache
$ sync && echo 3 | sudo tee /proc/sys/vm/drop_caches

3)Release memory used by the Linux kernel on caches
$ sbin/sysctl -w vm.drop_caches=3

4)Clear the cache from memory
$ sync; echo 3 > /proc/sys/vm/drop_caches

5)Clear filesystem memory cache
$ sysctl -w vm.drop_caches=3

6)How to clear bash history completely
$ cat /dev/null > ~/.bash_history && history -c && exit

Thursday, August 7, 2014

How to fix Press S to Skip Mount during boot on Ubuntu

1. At Terminal, type sudo gedit /etc/fstab
How to fix Press S to Skip Mount during boot on Ubuntu
(Note: It will ask for a administration password, or your own account password, type it and press Enter.)
Then the gedit with fstab file appears.

2. Find the line or entry that cause the error message. See the below example. Then delete or remove that line or entry.
How to fix Press S to Skip Mount during boot on Ubuntu

3. Then save to gedit fstab file, click File then click Save. Then exit geditfstab file. Restart your computer you will notice that the error message will gone in no time.

Wednesday, April 30, 2014

Disable or Enable USB Mass Storage Devices using Registry

If the administrator is smart then he would definitely do this to ensure a tight blockade. He would alter the settings through regedit command on run console. Now how do you unlock it ? You have to go right into where the administrator has been. Here is how.

Go to Start > Run , type “regedit” and press enter to open the registry editor
Navigate to the following key
HKEY_LOCAL_MACHINE\SYSTEM\CurrentControlSet\Services\USBSTOR
In the right pane, select Start and change the value to 3. (The value 4 will disable USB Storage). Click OK. This will re-enable USB Ports and allow you to use USB or Pen drives.

How to Disable and Enable USB Device in Linux/Ubuntu

Open a Terminal by using Ctrl+Alt+T or Applications->Accessories->Terminal. You need to have root access to do this tweak. Copy and paste the following command in the Terminal. Type the password for the user, when prompted.

sudo gedit /etc/modprobe.d/blacklist.conf

Now copy and paste this line “blacklist usb_storage” at the end of the file. After adding this save it and close the gedit.

2) Add this line “modprobe -r usb_storage” before exit 0 in /etc/rc.local
To add : Copy and paste the following command in the Terminal. Type the password for the user, if prompted.
 sudo gedit /etc/rc.local
The above command will open the rc.local file in gedit. Now copy and paste this line “modprobe -r usb_storage” before the last line of the file. After adding this save it and close the gedit. Check the below screen shot for Fedora and Ubuntu.

Disable or restrict the use of Windows Installer via Group Policy

Type gpedit.msc in start search and hit Enter to open the Group Policy Editor.
Navigate to Computer Configurations > Administrative templates > Windows Components > Windows Installer. In RHS pane double-click on Disable windows installer. Configure the option as required.
1) He “Never” option indicates Windows Installer is fully enabled. Users can install and upgrade software. This is the default behavior for Windows Installer on Windows 2000 Professional, Windows XP Professional and Windows Vista when the policy is not configured.
2)The “For non-managed apps only” option permits users to install only those programs that a system administrator assigns (offers on the desktop) or publishes (adds them to Add or Remove Programs). This is the default behavior of Windows Installer on Windows Server 2003 family when the policy is not configured.
3)The “Always” option indicates that Windows Installer is disabled.
This setting affects Windows Installer only. It does not prevent users from using other methods to install and upgrade programs.

Thursday, April 24, 2014

How to Login as a root from GUI | Ubuntu 12.04 LTS Precise Pangolin

You just need to follow these 5 Steps and you will able to Login as a root From GUI in Ubuntu 12.04 LTS Precise Pangolin.

1) First login as a normal user which you have created during Installation.

2) Open terminal by pressing “Ctrl+Alt+T”

3) Execute Below Command.

sudo passwd root

[sudo] password for sachin: ****** (Normal User Password)

Enter new UNIX password: ******

Retype new UNIX password: ******

4) That’s It. You have successfully Setup Your root user’s password. Now Log out from Current User.

5) Now reboot Ubuntu 12.04 LTS Precise Pangolin, You will see “OTHER”. Click on it ,which asks for Username and Password on Login screen/Window.

Most probably you wont find the other option, so here are the steps to add the other option!

Make sure you have completed the above steps,not press ctrl+alt+T to fire up a new terminal window

1. sudo cp -p /etc/lightdm/lightdm.conf /etc/lightdm/lightdm.conf.orig
2. sudo /usr/lib/lightdm/lightdm-set-defaults -m true
3. sudo /etc/init.d/lightdm restart

Now you are all set to go , a new option “LOG IN”  is added to the log in menu, type the username as “root” and your super user password as your password there !